You can make transparent PNG images to create all kinds of great pictures to include in your graphics. You can have photos of your products placed on an advertisement, pose a person next to a message you want to send out to make an extra impact, and even use your company logo on any design. But you might be wondering how to do this if you don’t know about graphic design.
You can make any PNG image transparent by following these steps using Laughingbird Software’s FREE Graphics Creator:
- Select the image you wish to make transparent.
- Place the image on your Graphics Creator canvas.
- Use the remove color tool to make a transparent background.
- Use the image shadow tool to add contrast where needed.
- Use the remove.bg tool if needed.
- Repeat the process for each image you want to make transparent.
- Grab a ready-made template from the Graphics Creator.
In this article, I’ll go over the simple steps to make any PNG transparent; that is, without a background. So, follow these steps one by one and see how to make a PNG transparent using the Graphics Creator tool, fast and easy.
And watch this video showing you simple tricks to create transparent PNGs in a matter of minutes:
1. Select the Image You Want To Make Transparent
You can make any PNG image into a transparent PNG file to use in your online graphics. This could be either an image that you’ve photographed or created yourself, taken from the Graphics Creator online image library, or gotten from any royalty-free stock image agency.
Either way, before selecting an image for your needs, you should consider what you want the image to portray.
If you have an idea in mind for the graphic you want to create, then you may know exactly what you need to make this idea a reality. If not, think about the purpose of the graphic:
- Are you showing a product?
- Do you want to put your face to your company or message?
- Do you want to connect with your viewers more meaningfully?
Whatever the purpose, you can find an image online to use in your graphics. With a high-quality camera, you can also take your own photos and upload them directly to the software.
Adding Your Own Images
If you’re adding your own PNG image, you can do this by dragging it directly into the Graphics Creator, after uploading or transferring it onto your computer. When you drag it onto a blank software canvas, it will be the only image you see. Otherwise, it’ll be added as a layer over the template you’ve used as the basis for your graphic (if you started with a template and not a blank canvas).
You will be making the image on the canvas transparent. So, if you want only the object transparent, then there shouldn’t be any other graphic on the canvas (not even an added background). The best image to use would be of a person or object set against a contrasting canvas color (I’ll explain why this is in more detail below).
If you don’t have a ready-made image of your own, let’s look at how to use an image found online.
Adding an Image From the Online Stock Photo Database
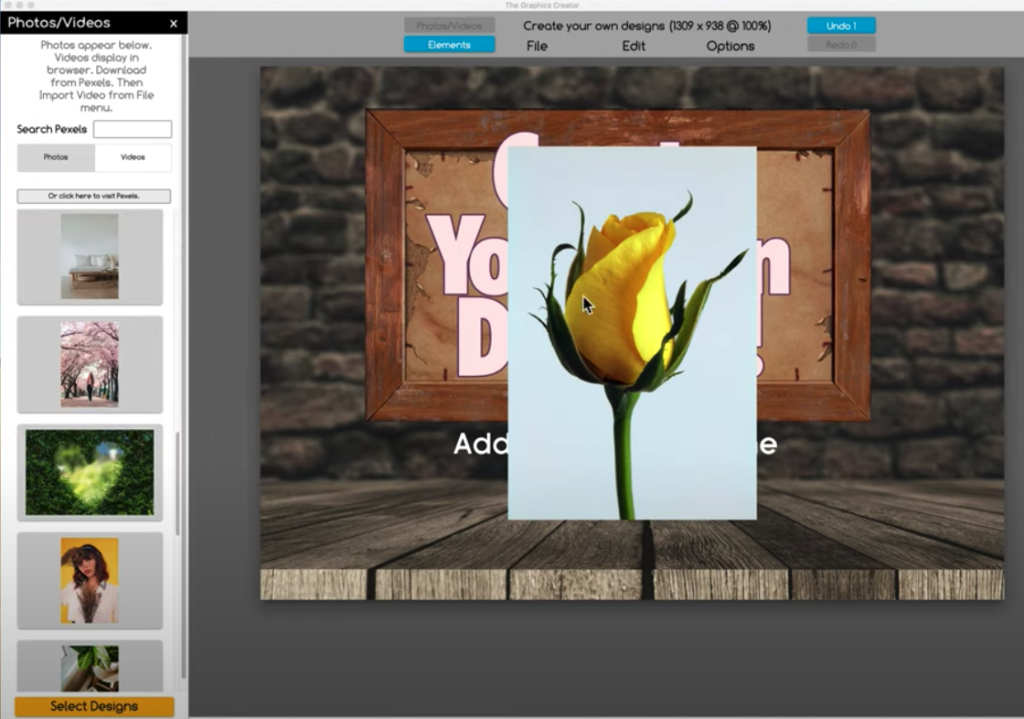
The great thing about the Graphics Creator software is that it’s integrated with Pexels. In this huge online image database, photographers and artists allow you to use images for free with no copyright issues.
So, if you need an image to upload to your graphic to begin making a transparent PNG background, first look through the search function on the “Photos and Videos” tab on the menu, where many images from Pexels will already be available to choose from.
If a suitable image is not on that menu, then it’s no problem! Simply select “Or Click Here To Visit Pexels,” and you’ll be able to look through their full database.
When you’ve found an image you want, keep in mind you can’t drag the file directly from the website to the Graphics Creator; instead, you’ll need to download it to your computer first.
Once downloaded, you can drag the PNG file directly onto the Graphics Creator. As with your own images, this PNG file will appear as a layer over a template if you have selected one.

2. Place the Image on Your Graphics Creator Canvas
Now, place your PNG image on your graphics canvas.
You have two options to make it transparent:
- The first way is to use the File menu to simply download it as a transparent image (select “PNG” and check the “transparent” box). You are essentially just saving your image in a new file format that will not include the background. Then you will be able to take your new transparent PNG and add it to a marketing design or advertisement, logo, business card, or another graphic.
- The next way to make your image transparent is to use the “Remove Color” tool (I’ll discuss this in detail in the next step). With this method, you can create your entire design in one shot, without leaving it.
For now, position your PNG image where you want it on the canvas. Think about where you want it to sit. For example, if the image is of a person pointing, you may want to position them to point to your text, message, or product.
You can also use the tools within the graphics maker to move and resize the image to get it exactly where you want it. Think about making sure there are no awkward gaps between the image and the edge of the canvas or that there are no parts of the image awkwardly hidden.
3. Use the Remove Color Tool To Make a Transparent Background
Now, this is where the technology of the Graphics Creator software comes in to create transparency in the image. Follow these steps:
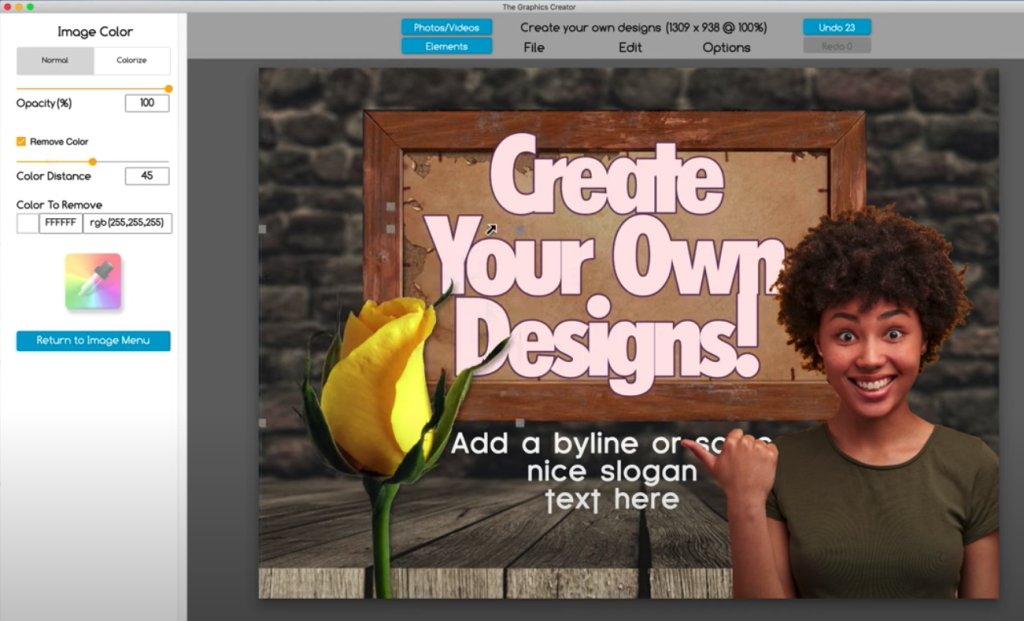
- Select the image and click “Image Color” in the sidebar. Ensure that you have the image selected (by double-clicking it) before doing so.
- Check the box that says “Remove Color.” If the software picks up a light background straight away, then this should make the majority of the background color transparent, leaving only the subject of the image.
- Move the slider located below the “Remove Color” checkbox. This slider adjusts the sensitivity of the color remover. If you can see small amounts of background color remaining, try moving the slider to the right to take more of the image away, but make sure it doesn’t remove any of the colors in the image itself.
Watch this video to show you exactly how to create a transparent image using The Graphics Creator:
There are some cases where the background removal won’t work straight away, but I’ll cover what to do when this happens in a moment.

Use the Color Picker To Highlight the Background You Want To Remove
If the image background isn’t very light, then the color remover will not work straight away when you check the “Remove Color” box. In this case, you can still make it work by selecting the color to be removed.
Below the checkbox and slider, you’ll see a color picker in a rainbow box. Simply click on it and use this to select the color you want to be removed from the image, and the color remover will do the work; then, you can use the slider tool to change how much is removed as described above.
You can also use the color picker to remove non-background colors, such as a central part of your image. Be careful, as this can have very interesting effects on your image and remove features you don’t intend to make a transparent png background.
4. Use the Image Shadow Tool To Add Contrast Where Needed
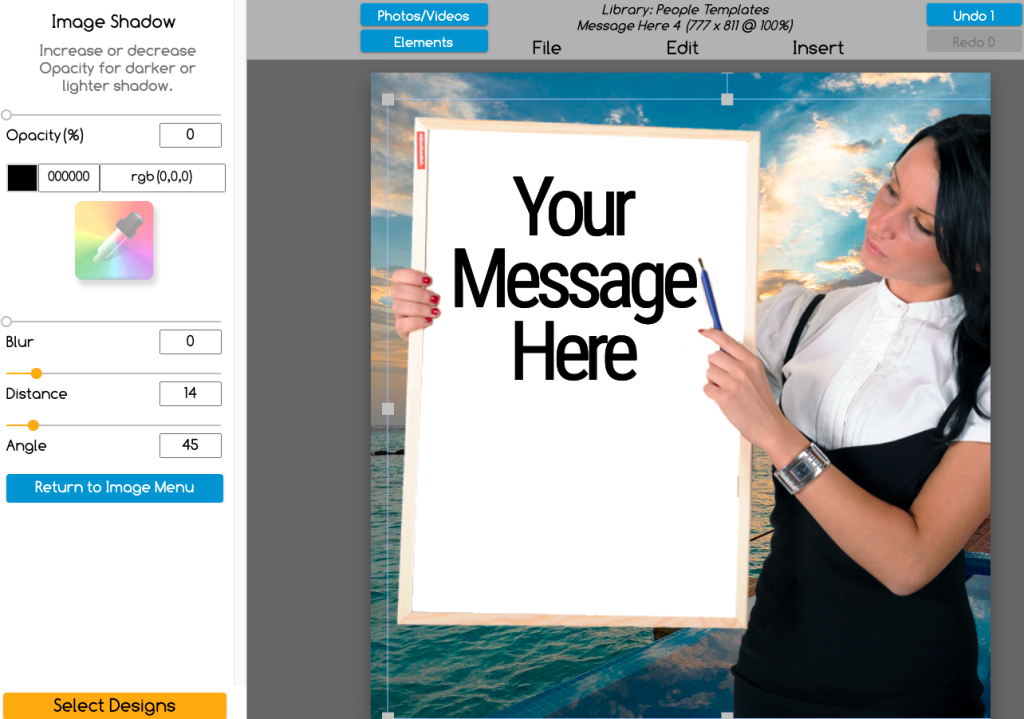
To make the image subject really pop out against the transparent background, you should select the “Image Shadow” tab on the sidebar and choose a border that works for you.
Using the “Blur” slider, for example, will give the image a more 3D shape that works well, but you can also use a more clearly defined flat border if you think this works better for you. Think about where and how the image will sit on your template.
5. Use the remove.bg Tool (Optional)
There are situations where the color remover in the Graphics Creator software may not work as well as you’d like, such as when there are too many colors within the image subject similar to the background, or the background has a range of different colors that cannot be selected at once.
Luckily, there is still a way to remove these using a free transparent background maker called remove.bg. With this easy png background remover, simply take the PNG file you want to upload from your computer and drag it into the remove.bg front page.
This online software then detects where the background is and will automatically remove it while leaving the main png file image intact. You can then download the newly edited image background.
When you add this image back into the Graphics Creator, it’ll include the new image with a transparent background, and you can move it around to the right position.

6. Repeat the Process for as Many Images as You Need
Now that you have mastered background removal, you can repeat this again and again as needed. If you need many different images for your graphics, you can add as many as you want to your template and adjust them as necessary to make the perfect image.
There’s no limit to the number of images you can create with the Graphics Creator, and by playing with the color remover and color picker, you can create some interesting effects. Spending time experimenting might give you new ideas or show you special effects that you hadn’t thought of before to really enhance your image.
7. Grab a Ready-Made Template From the Graphics Creator
Still taking too long, in a rush, or just want to make a great image without the extra steps? You can still add a picture with a transparent background to a Graphics Creator design template.
The Graphics Creator software has ready-made templates to help you create artwork for your social media, website, marketing, or blog. Just scroll through the included template library and select the design you need.
You can then add your new transparent PNGs, design elements included in the software, stock images, or even background graphics to your chosen template.
It’s as simple as dragging these onto your template, and you’re ready to go!

Final Thoughts
Making a PNG transparent doesn’t have to be challenging. Although it can feel overwhelming to some, the process is relatively simple, and it can be done in various ways. Using the Laughingbird Software Graphics Creator to make your PNG transparent is ideal, as all you have to do is place the image in the software and use the “Remove Color” tool to get the desired results.
Additionally, this software allows you to make your images into a more 3D shape with the “Image Shadow” tool, leaving you with a high-quality transparent PNG.
Take a look at this article if you’re interested in finding transparent PNG images online that already have the background removed!


